
My Adventure in Building a Custom Copilot Connector - Part 1
Posted on Fri 22 August 2025 in Tech Blog
Microsoft Copilot is a game changer for productivity, especially when it’s grounded in your Microsoft 365 data. But it’s important to recognize that not all your data lives within your M365 tenant. That’s where Copilot extensibility provides a clear benefit by giving you the ability to expand Copilot’s functionality in key ways.
At a high level, Copilot extensibility lets you expand either the knowledge (the data Copilot is grounded on) or the skills (the tasks Copilot can perform). Copilot connectors (previously Graph connectors) allow you to extend Copilot’s knowledge, while agents can extend both knowledge and actions. It's a bit nuanced, but each option has its pros and cons, and there are definitely scenarios where one solution makes more sense over another, but I’ll save a detailed comparison for another post.
For now, I want to focus on Copilot connectors. More specifically, building my own custom connector to ingest some external content into my M365 tenant boundary to make use of Copilot and the semantic index.
Believe it or not, I’m NOT a developer. So when I started this journey, I couldn’t just dive in and build a connector from scratch. I had to take it step by step. Fortunately, I am comfortable with PowerShell and familiar with Graph APIs, so that’s where I began. As a learning exercise, it turned out to be a great approach. It allowed me to build incrementally on what I already knew and ultimately get a simple connector up and running in my dev environment.
A Bare Bones Copilot Connector - My Initial Goals
To keep things manageable, I started with a simple plan:
- Identify the specific APIs and permissions required.
- Break the process down into minimal steps and build using PowerShell.
- Deploy a POC Copilot connector to my environment.
Getting started
This was pretty simple as the connector development process is pretty well documented. Using this documentation, I simplified the processes to 3 core steps:
In order to build using Microsoft Graph, we need to authenticate using the correct permissions. We can do this by creating an app registration through Microsoft Entra and using that information as part of our authentication flow.
The important bits here are:
-
Application (client) ID
You will get this automatically once the app registration process is complete. It can be found in the Overview section on the left.
-
Certificates & secrets
You'll need to create either the certificate or secret here, depending on how you want to authenticate. You can use PowerShell to create self-signed certificates for use with the Graph PowerShell SDK.
-
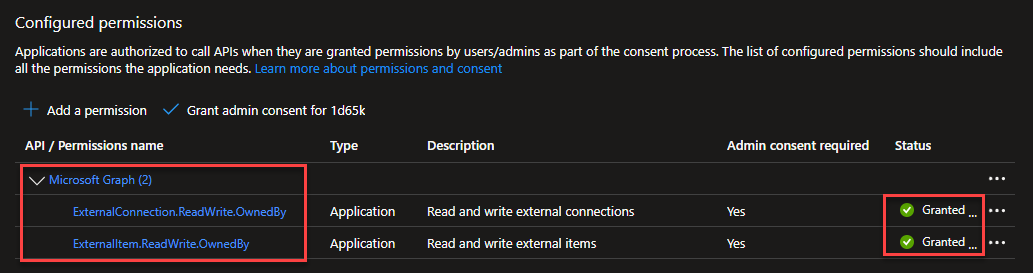
API Permissions
You'll need to ensure you have the correct permissions assigned AND consented to. The required permissions (from documentation above) are:
- ExternalConnection.ReadWrite.OwnedBy
- ExternalItem.ReadWrite.OwnedBy
The PowerShell Process
The Graph PowerShell SDK provides an easy method to authenticate using the Entra app registration previously created. For security purposes, I use a .env file to hold my auth data so I don't store any credentials in plain text. I've included two code snippets to show authentication using both Certificates and secrets. The snippets read the .env file and passes the appID, tenantID and certificate thumbprint/client secret to the Connect-MgGraph cmdlet:
#Authentication using Certificate
$data = get-content -Path .env
$appID = ($data[0].split("="))[1]
$tenantID = ($data[1].split("="))[1]
$authCertThumb = ($data[2].split("="))[1]

Connect-MgGraph -ClientId $appID -TenantId $tenantID -CertificateThumbprint $authCertThumb -nowelcome
#Authentication using client secret
$data = get-content -Path .env
$appID = ($data[0].split("="))[1]
$tenantID = ($data[1].split("="))[1]
$clientSecret = ($data[2].split("="))[1]

$securedPassword = ConvertTo-SecureString `
-String $clientSecret -AsPlainText -Force

$clientsecretCredential = New-Object `
-TypeName System.Management.Automation.PSCredential `
-ArgumentList $appID, $securedPassword

Connect-MgGraph -TenantId $tenantID -ClientSecretCredential $clientsecretCredential -nowelcome
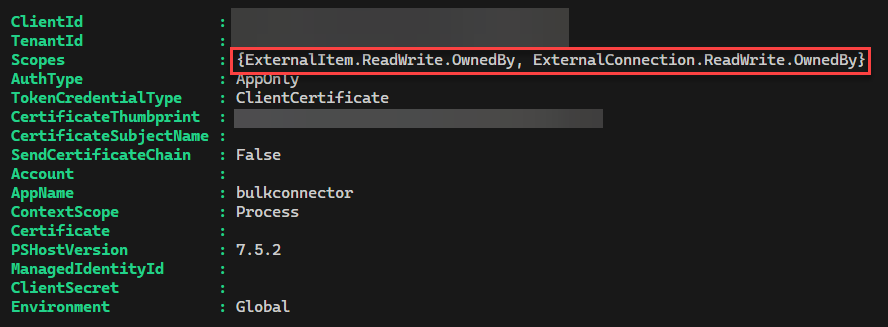
Once successfully authenticated, you can verify the session permissions by running the Get-MgContext cmdlet ensuring you see the permissions consented to previously:
Now that you have successfully authenticated, the next step is to create the external connection. Think of this as an empty container that will eventually hold the Schema configuration and the ingested external items. The necessary cmdlet from the Graph PowerShell SDK is New-MgExternalConnection. You'll need to pass in three values: the Name, ID, and Description for the Copilot Connector:
$connectionName = "TestCopilotConnector"
$connectionParams = @{
    id = $ConnectionName
    name = $ConnectionName
    description = "Test connector called $ConnectionName. Containing a list of company names."
}

New-MgExternalConnection -BodyParameter $connectionParams
With the external connection created, the next step is to define the schema and update the external connection with that schema data:
#create schema
$connectionName = "TestCopilotConnector"

$schemaParams = @{
    baseType = "microsoft.graph.externalItem"
    properties = @(
        @{
            name = "CompanyName"
            type = "String"
            isSearchable = "true"
            isRetrievable = "true"
            labels = @(
            "title"
            )
        }
    )
}

Update-MgExternalConnectionSchema -ExternalConnectionId $ConnectionName -BodyParameter $schemaParams
⭐⭐ It should be noted at this point that the Schema creation process can take between 5 and 15 minutes. The documentation recommends using the location response header to get the current status of the schema creation operation ⭐⭐
With the first two steps complete, you have the shell of a Copilot connector and are ready to write items. Rather than connect to an actual external API, to keep this first attempt simple, I used Copilot to create a .CSV list of fictional companies with a description for each. The script reads that .CSV file and creates new items for each object, mapping properties to the simple schema I created, using a GUID as the item ID and setting the ACL to allow access for everyone:
Import-Csv -Path "C:\fictitious_companies.csv" | ForEach-Object {
        $params = @{
            acl = @(
                @{
                    type = "everyone"
                    value = "everyone"
                    accessType = "grant"
                }
            )
            properties = @{
                CompanyName = $_.name
            }
            content = @{
                value = $_.description
                type = "text"
            }
        }
    Set-MgExternalConnectionItem -ExternalConnectionId "test" -ExternalItemId (New-Guid) -BodyParameter $params
}
If you are interested, I have a PowerShell sample script I've written as an example of how you might put it all together in one expirence, rather than several separate scripts.
Conclusion
This first step into building a custom Copilot connector was all about getting comfortable with the basics. Understanding the architecture, setting up authentication, and pushing some sample data into Microsoft 365. While it’s far from production-ready, this proof of concept gave me a solid foundation to build on. In the next posts, I’ll dive deeper into:
- Designing and refining the schema to support richer, more useful data
- Building a Python-based connector, hosted inAzure App Services
- Enabling the connector for Copilot consumption and real-world use
If you’re just getting started with custom Copilot connectors, I hope this gave you a helpful head start. Stay tuned for more.